How to standarlize your Python project with scikit-package
Installation
To get started, install scikit-package, black, and pre-commit in a new conda environment. Follow the steps below:
Create a new environment named scikit-package_env:
conda create -n scikit-package_env
Activate the environment:
conda activate scikit-package_env
Install packages:
pip install scikit-package black pre-commit
You are now ready to scikit-package your Python project!
Overview
We have divided the scikit-package process into four workflows:
Pre-commit workflow: you will use automatic formatting tools to standardize your package with PEP8 before migrating it to the Billinge group’s project structure with
scikit-package. Then, thepre-commitlibrary installed is used ensure the code is in good shape. You can skip this step if you are starting a new project.scikit-package workflow: After your code is formatted, you will use the
scikit-packagelibrary to generate a new project inside the package directory. The new project contains dynamically filled templates based on your inputs such as repository name, license, and contributors. Then, you will move files from the old to the new structure using Git.API documentation build workflow: Once you have scikit-packaged your GitHub repository, you will use our Python script to automatically generate API documentation for your package and render the documentation locally.
Final sign-off: After you’ve checked the licenses, README, and documentation, you will host your package documentation online. Once you are done with this page, we will guide you on how to release your project on a separate page here.
Tips and how to receive support
We offer the following ways to help guide you through the scikit-package process:
You may cross-check with the Billinge group’s up-to-date package,
diffpy.utils: https://github.com/diffpy/diffpy.utils.If you have any questions, first read the FAQ for how to customize your package and certain design decisions in the scikit-package template.
After you’ve cross-checked and searched through the FAQ, please feel free to ask questions by creating an issue on the scikit-package repository here.
1. Pre-commit workflow
Important
Are you starting a new project? Skip this section and go to 2. scikit-package main workflow!
Fork the repository and clone your forked your repository to your local. If you are not familiar with GitHub workflows, please refer our brief guide provided here.
cdinto the top-level directory of that project.Type
git pull upstream mainto sync with the main branch. If it is an older project, you may have to rungit pull upstream master.Double-check that no bug-fix etc. pull-requests are waiting to be merged. If you are a member, check with the project repository owner if you are unsure.
Create a new branch called
blackby typinggit checkout -b black.Create
pyproject.toml. Copy and paste the following topyproject.toml.[tool.black] line-length = 79 include = '\.pyi?$' exclude = ''' /( \.git | \.hg | \.mypy_cache | \.tox | \.venv | \.rst | \.txt | _build | buck-out | build | dist # The following are specific to Black, you probably don't want those. | blib2to3 | tests/data )/
Run
black srcin your Terminal. If your source code is in a different directory, replacesrcwith the appropriate directory path. This will automatically format your code to PEP8 standards given the line-length provided underline-lengthabove inpyproject.toml.Add and commit the automatic changes by
black. The commit message can begit commit -m "style: apply black to src directory with black configured in pyproject.toml".Run
black .Here, you are running black across the entire package directory. Then, test your package with unit tests locally.git add and commit the changes. The commit message can be
git commit -m "style: apply black to all files in the project directory".Create a pull request into
main. The pull request title can bescikit-package: Apply black to project directory with no manual edits.After the
blackbranch has been merged tomain, typegit checkout main && git pull upstream mainand create a new branch calledprecommitby typinggit checkout -b precommit.Copy and paste two files of
.flake8` and.pre-commit-config.yamlfrom https://github.com/diffpy/diffpy.utils to your project directory.diffpy.utilsis a good example of a project that has been scikit-packaged.Run
pre-commit run --all-filesin your Terminal. This will attempt to lint your code such as docstrings, extra spaces, across all file types such as.yml,.md,.rst, etc. However, most likely, you will have to manually fix some of the errors raised byflake8,codespell, andblack.Before manually editing, let’s first take a look at the changes made by running
git statusto get an overview of the files modified and then by runninggit diff <file-or-directory-path>to see the specific changes. If you do not want the new changes, you can rungit restore <file-or-directory-path>to revert the changes.Note
Q1. Do you want to ignore certain spelling recommendations by Codespell? Please refer to this section in the FAQ here.
Q2. Do you want to prevent certain automatic modifications on specific file types? You can add the folder or extension to the
excludesection in.pre-commit-config.yaml. Check <https://github.com/Billingegroup/scikit-package/blob/main/.pre-commit-config.yaml>`_.At this point, you may have flake8 errors but we want to address them in a separate pull request. Hence, git add and commit and push the automatic changes made by
precommitand create a pull request tomain. The commit message can bestyle: apply pre-commit without manual modificationand the pull request title can bescikit-package: Apply pre-commit to project directory with no manual edits.After the
precommitbranch has been merged tomain, rungit checkout main && git pull upstream mainand create a new branch calledflake8by typinggit checkout -b flake8. If you have many flake8 errors and types, feel free to create one branch for each specific type of error, likeflake8-length.
Here are some tips to reduce cognitive overload:
Start with easier error types to fix, such as line lengths and “module imported but not used”, etc.
Create multiple PRs, each containing a specific theme (e.g., “Fix docstring line-length flake8 errors” using the
flake8-lengthbranch, etc.) to reduce cognitive overload for the reviewer.If you are unsure, suppress the flake8 error by adding
# noqa: <error-code>at the end of the line. For example,import numpy as np # noqa: E000but make sure you create an issue for this so that you can revisit them after scikit-package.
For each flake8 branch, create a PR request to main. Since you are fixing flake8 errors, the commit message can be style: fix flake8 <readable-error-type> errors and the pull request title can be scikit-package Fix flake8 <readable-error-type> errors. In each PR, feel free to communicate the remaining flake8 issues in each pull request to track progress.
Congratulations! You have successfully completed the pre-commit workflow. You may proceed to the section to now transform your package structure!
2. scikit-package main workflow
If you are migrating an existing project,
Attention
Ensure no files are overwritten or lost.
Do NOT delete/remove any files before confirming that it is absolutely unnecessary. Create an issue or contact the maintainer.
Do NOT delete project-specific content such as project descriptions in README, license information, authors, tutorials, examples.
If you are unsure, please ask for help.
If you are here starting a new project, the 1, Pre-commit workflow section is completed in the project template. Visit installation section and download the dependencies that we will be using.
Type
package createinside the project directory.Answer the questions as the following – note that (default) means to hit enter without modifying anything:
- github_org:
The GitHub organization name or owner’s GitHub username. e.g.,
Billingegroup.- keywords:
The keywords of the project. Each word is separated by a comma and a space. e.g.,
pdf, diffraction, neutron, x-ray. The keywords may be found inpyproject.tomlorsetup.py.- project_name:
The name of the project e.g.,
my-package. For a namespace package, use e.g.,diffpy.my-package.- package_dist_name:
The name in the package distribution in PyPI and conda-forge .If your package name contains
_, replace it with-. e.g.,my-package. For a namespace package, use e.g.,diffpy.my-package.- package_dir_name:
The name of the package directory. It must be lowercase e.g.,
my_packageso that it can be imported asimport my_packagein a Python script.- repo_name:
The repository name of the project displayed on GitHub. It should be identical as the project_name.
- min_python:
The minimum Python version. The default is
3.11.- max_python:
The maximum Python version. The default is
3.13.- have_c_code:
Whether the package require C/C++ code that requires building the package. For pure Python packages, this is
False. The default isFalse.- headless_GUI_test:
Run headless testing in GitHub CI. If your package does not contain GUI, the default is
False.- workflow_version:
Version of the reuseuable workflow to use.
v0is the default.
Important
Skip the rest of scikit-package main workflow if you are starting a new project! Proceed to the 3. API documentation workflow below. Otherwise, please continue!
cd into the new
diffpy.<package_name>/directory (e.g., in our examplepwdwould return~/dev/diffpy.pdfmorph/diffpy.pdfmorph) (we will refer to the nested directory as the “scikit-package” directory and~/dev/diffpy.pdfmorph/as the “main” directory).Type
ls -als(if you have the alias, this isll) compare the directory structures in this directory tree to that in the original repo to see what is different (ignore files at this point). Nothing to do here, just get familiar with the differences.Type
mv ../.git .to move the.gitdirectory from the main repo to the scikit-package repo.Create a new branch for all the changes, e.g.,
git checkout -b package-release.Type
cp -n -r ../src .to copy the source code from the main to the scikit-package repo, without overwriting existing files in the destination. If there is no src directory, it will be something likecp -n -r ../diffpy ./src.Type
git statusto see a list of files that have been (1) untracked, (2) deleted, (3) modified. Untracked files are in the scikit-package but not in the original repo, deleted files are in the original but haven’t been moved over, and modified files are in both but have been changed.Let’s now copy over any documentation, similar to what we did with the src files. We want to copy over everything in the
doc/<path>/sourcefile from the old repo to thedoc/sourcefile in the new repo.If you see this extra
manualdirectory, runcp -n -r ../doc/manual/source/* ./doc/source.If files are moved to a different path, open the project in PyCharm and do a global search (ctrl + shift + f) for
../or..and modify all relative path instances.
Now we will work on correcting all the things that are wrong.
Add and commit each of the (1) untracked files to the git repo. These files are in the scikit-package repo but not in the main repo, so can simply be “git added”. Do it one (or a few) at a time to make it easier to rewind by having multiple commits.
Make a PR of your
package-releasebranch by pushing your fork and opening a PR.Files showing as (2) “deleted” upon git status are in the main repo but not in the scikit-package repo. We took care of most of these by moving over the src tree, but let’s do the rest now. Go down the list and for <filename> in the
git status“delete” files typecp -n ../<filepath>/<filename> ./<target_filepath>. Do not move files that we do not want. If you are unsure, feel free to confirm with Simon.Files that have been (3) modified exist in both places and need to be merged manually. Do these one at a time. First open the file in PyCharm, then select
Git|current file|show diffand the differences will show up. Select anything you want to inherit from the file in the main repo. For example, you want to copy useful information such as LICENSE and README files from the main repo to the scikit-package repo.Any files that we moved over from the old place, but put into a new location in the new repo, we need to delete them from git. For example, files that were in
doc/manual/source/in the old repo but are notdoc/sourcewe correct by typinggit add doc/manual/source.
Run pytest
python -m pytestorpytestto make sure everything is working. There should be no errors if all tests passed previously when you were working on pre-commit. You may encounter deprecation warnings. There might be several possibilities:
fixes separate from scikit-packageing. Remember to add it to Github issue.
Most
pkg_resourcesdeprecation warnings will be fixed by scikit-package, but if you are in a diffpy package using unittests and see this warning you can fix them by replacingfrom pkg_resources import resource_filenamewithfrom importlib import resourcesand changepath = resource_filename(__name__, p)topath = str(resources.files(__name__).joinpath(p)). If you seecollected 0 items no tests ranyou might want to rename testing files astest_*.py. Refer to the [migration guide](https://importlib-resources.readthedocs.io/en/latest/migration.html).
3. API documentation workflow
This should be done only when the above steps are finished.
When you see files with ..automodule:: within them, these are API documentation. However, these are not populated. We will populate them using our release scripts.
Make sure you have our release scripts repository. Go to
devand rungit clone https://github.com/Billingegroup/release-scripts.git.Enter your scikit-package package directory. For example, I would run
cd ./diffpy.pdfmorph/diffpy.pdfmorph.Build the package using
python -m build. You may have to installpython-buildfirst.Get the path of the package directory proper. In the case of
diffpy.pdfmorph, this is./src/diffpy/pdfmorph. In general, fora.b.c, this is./src/a/b/c.Run the API script. This is done by running
python <path_to_auto_api> <package_name> <path_to_package_proper> <path_to_api_directory>.If you have followed the steps above, the command is
python ../../release-scripts/auto_api.py <package_name> <path_to_package_proper> ./doc/source/api.
Make sure you build the documentation by going to /doc and running make html.
The error “No module named” (e.g. WARNING: autodoc: failed to import module 'tools' from module 'diffpy.pdfmorph'; the following exception was raised: No module named 'diffpy.utils') can be resolved by adding autodoc_mock_imports = [<pkg>] to your conf.py right under imports. This file is located in /doc/source/conf.py. In the case of PDFmorph, this was done by adding autodoc_mock_imports = ["diffpy.utils",].
Congratulations! You may now commit the changes made by auto_api.py (and yourself) and push this commit.
4. Final sign-off
For the
package-releasebranch, make a<branchname>.rstfile by copyingTEMPLATE.rstin the news folder and under “fixed” putRepo structure modified to the new diffpy standardIf a new Python version has been added under “added” add Add Python 3.xx, 3,xx support.. If a previous version has been removed, under “fixed”, add a new item Remove Python 3.xx, 3.xx, support..
Check the README and make sure that all parts have been filled in and all links resolve correctly.
Run through the documentation online and do the same, fix grammar and make sure all links work.
Follow the instructions on setting up GitHub pages here.
Appendix 1. How to test your package locally
Ensure your package has been scikit-packaged. We will use the diffpy.utils package as an example. In the package directory, follow these instructions:
# Create a new environment, specify the Python version and install packages
conda create -n diffpy_utils_env python=3.13 \
    --file requirements/test.txt \
    --file requirements/conda.txt \
    --file requirements/build.txt

# Activate the environment
conda activate diffpy_utils_env

# Install your package locally
# `--no-deps` to NOT install packages again from `requirements.pip.txt`
pip install -e . --no-deps

# Run pytest locally
pytest

# ... run example tutorials
Appendix 2. How to build documentation locally
Follow these steps sequentially:
cd doc
make html
open build/html/index.html
To run as a single command:
cd doc && make html && open build/html/index.html && cd ..
Real-time preview with Visual Studio Code
Alternatively, you may render the Sphinx documentation by installing the Esbonio extension in VS Code. This will allow you to see the changes in real-time and increase productivity.
Appendix 3. How to write <branch-name>.rst news file
We require that each PR includes a news item of <branch-name>.rst file under the news directory.
Motivation and audience
.rst files under the news directory are used to compile and update the CHANGELOG.rst file during releases. Hence, these news items are of interest to both developers and technical users looking for specific keywords.
Guidelines for writing news items
Do not remove
news/TEMPLATE.rst. Make a copy called<branch-name>.rst.Do not modify other section headers in the rst file. Replace
* <news item>only. See example news files in Example 1 and Example 2.Begin with “No news”, “no news”, or “no news added” for trivial changes with the following format:
**Added:**

* No news: <brief reason>
Where to place the news item in <branch-name>.rst?
**Added:**includes features or functionality of interest to users and developers, such as support for a new Python version or the addition of a useful feature.**Changed:**includes modifications that affect end-users or developers, such as API changes or dependencies replaced.**Fixed:**includes bug fixes or refactoring.**Deprecated:**includes methods, classes, or workflows that are no longer supported in the future release.**Removed:**includes the opposite of the “Added” section, referring to features or functionality that have been removed.
Appendix 4. Codecov token setup for the repository
For each PR, we use Codecov to report the test coverage percentage change as shown below.
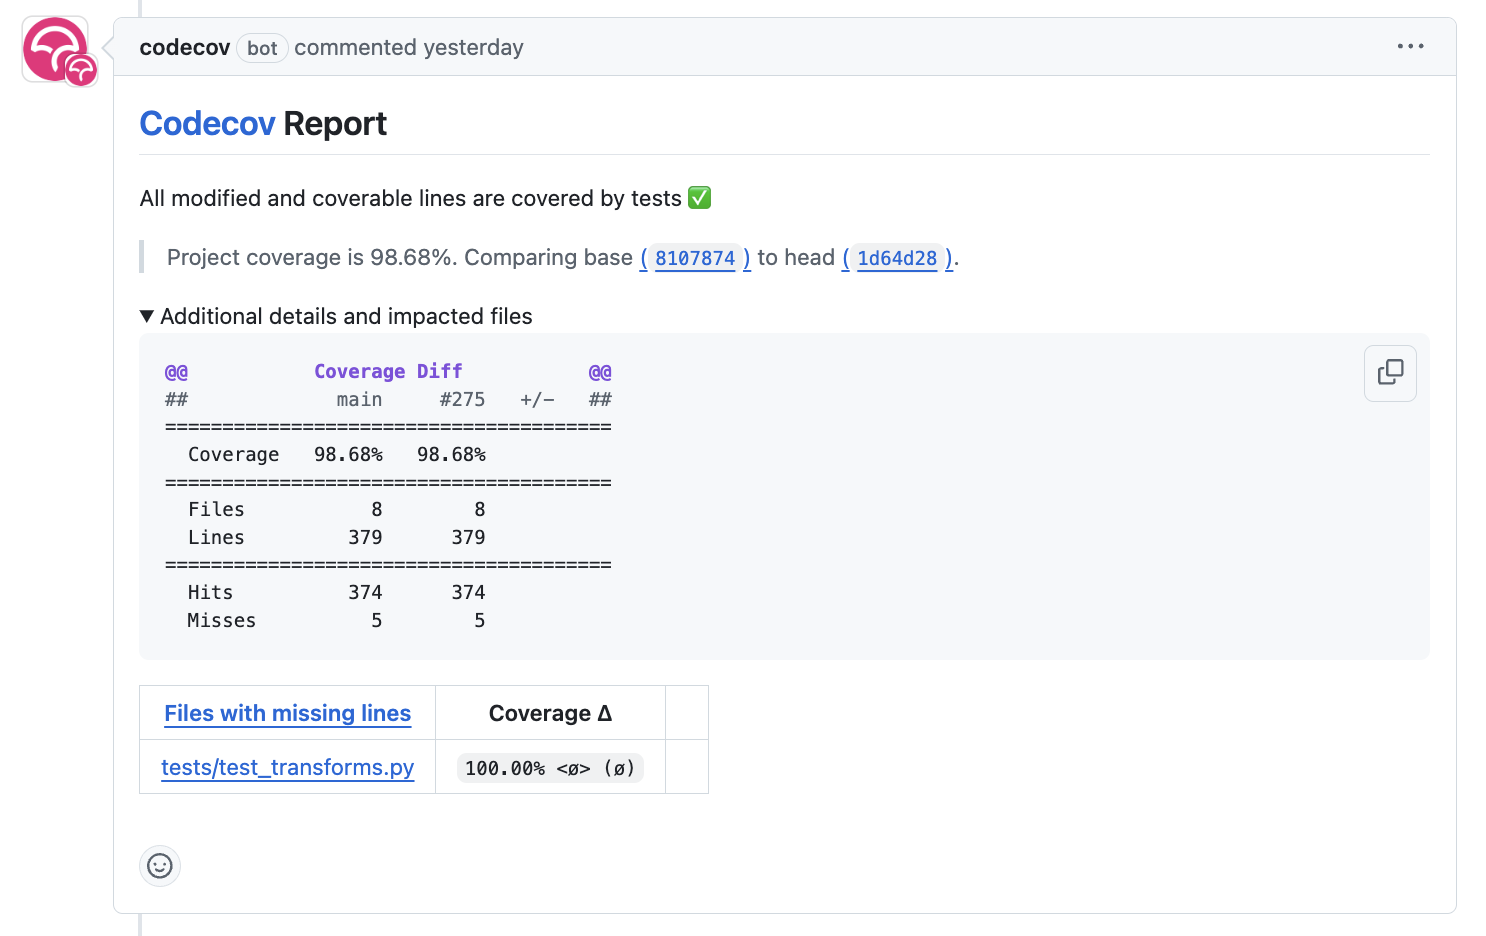
To do so, the repository owner (Prof. Billinge) needs to provide a CODECOV_TOKEN at the repository level. This token is used to authenticate the GitHub CI with Codecov. Please follow the step-by-step guide below.
Visit https://app.codecov.io/
Connect your repository or organization with Codecov by clicking
Configure Codecov's GitHub app, shown below:

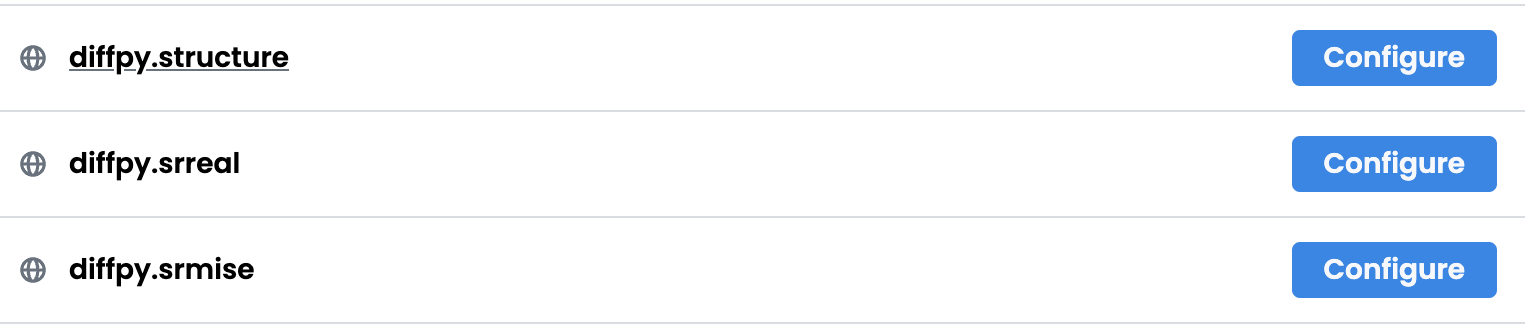
Scroll down, find your repository of interest, and click
Configure, shown below:
Scroll down again, copy
CODECOV_TOKEN, shown below:
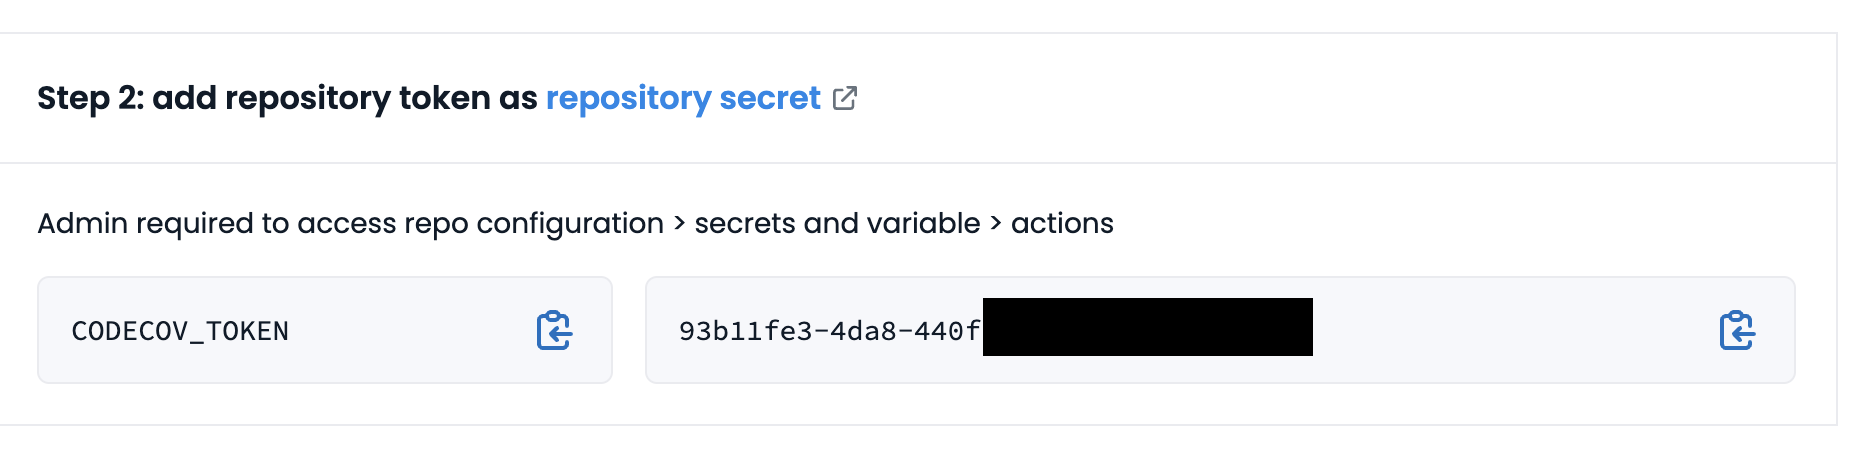
In your GitHub repository, go to
Settings, then clickActionsunder theSecrets and Variablestab.Click
New repository secret.Paste the token value and name it as
CODECOV_TOKENsecret as shown below:

Done. The Codecov token is now set up for the repository. A comment will be generated on each PR with the Codecov status automatically.
Appendix 5. How to configure pre-commit CI via GitHub Apps
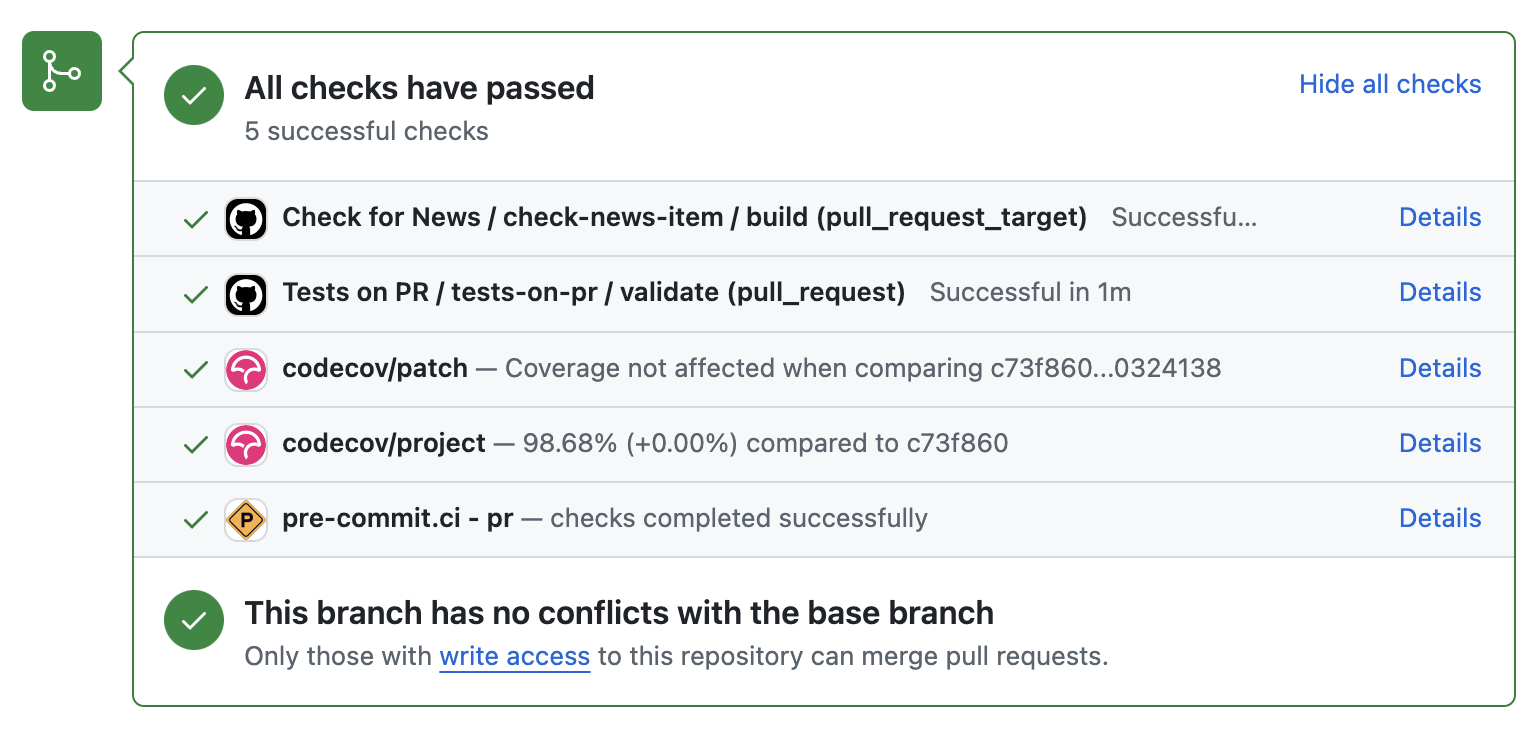
Pre-commit CI is available as a GitHub app that executes pre-commit hooks in each pull request, as shown in the image below. While it is recommended to run precommit run --all-files locally before making a PR, this GitHub app will automatically attempt to lint code and format docstrings according to the hooks provided in .pre-commit-config.yaml. If all passes, it will give you a green checkmark as shown below.
To configure pre-commit CI, follow the simple steps below:
Visit https://github.com/apps/pre-commit-ci and click “Configure”.
Select the repository(s).
Done!
Appendix 6. How to setup GitHub Pages for your package
You have API doc built and tested locally. Now you want to deploy your doc via https://org-name/github.io/repo-name i.e., https://diffpy.github.io/diffpy.utils using GitHub Pages.
Go to Settings in your repository.